概述
Spring的c和p命名空间可以注入依赖,也就是拓展方式注入
代码实现
StudentClass实体类
1
2
3
4
5
6
7
8
9
10
11
12
13
14
15
16
17
18
19
20
21
22
23
24
25
26
27
28
29
30
31
32
33
34
35
36
37
38
39
40
41
42
43
44
| package entity;
public class StudentClass {
private int id;
private String name;
public StudentClass() {
}
public StudentClass(int id, String name) {
this.id = id;
this.name = name;
}
public int getId() {
return id;
}
public void setId(int id) {
this.id = id;
}
public String getName() {
return name;
}
public void setName(String name) {
this.name = name;
}
@Override
public String toString() {
return "Class{" +
"id=" + id +
", name='" + name + '\'' +
'}';
}
}
|
c命名空间
在beans标签加上约束
1
| xmlns:c="http://www.springframework.org/schema/c"
|
定义bean
通过构造器参数注入
1
| <bean id="studentClass1" class="entity.StudentClass" c:id="1" c:name="www"/>
|
通过构造器下标注入
1
| <bean id="studentClass2" class="entity.StudentClass" c:_0="2" c:_1="www2"/>
|
注意事项
实体类中一定要定义一个有参构造器,不然使用c命名空间会报错
p命名空间
在beans标签加上约束
1
| xmlns:p="http://www.springframework.org/schema/p"
|
定义bean
1
| <bean id="studentClass3" class="entity.StudentClass" p:id="3" p:name="www3"/>
|
注意事项
实体类中如果定义了一个有参构造器,就需要自己手动定义一个无参构造器,不然使用p命名空间会报错
完整beans.xml代码
1
2
3
4
5
6
7
8
9
10
11
12
13
| <?xml version="1.0" encoding="UTF-8"?>
<beans xmlns="http://www.springframework.org/schema/beans"
xmlns:xsi="http://www.w3.org/2001/XMLSchema-instance"
xmlns:p="http://www.springframework.org/schema/p"
xmlns:c="http://www.springframework.org/schema/c"
xsi:schemaLocation="http://www.springframework.org/schema/beans http://www.springframework.org/schema/beans/spring-beans.xsd">
<bean id="studentClass1" class="entity.StudentClass" c:id="1" c:name="www"/>
<bean id="studentClass2" class="entity.StudentClass" c:_0="2" c:_1="www2"/>
<bean id="studentClass3" class="entity.StudentClass" p:id="3" p:name="www3"/>
</beans>
|
测试
1
2
3
4
5
6
7
8
9
10
11
12
13
14
15
16
17
18
19
20
| import config.MyConfig;
import entity.Student;
import entity.StudentClass;
import org.springframework.context.ApplicationContext;
import org.springframework.context.annotation.AnnotationConfigApplicationContext;
import org.springframework.context.support.ClassPathXmlApplicationContext;
public class MyTest {
public static void main(String[] args) {
ApplicationContext context = new ClassPathXmlApplicationContext("beans.xml");
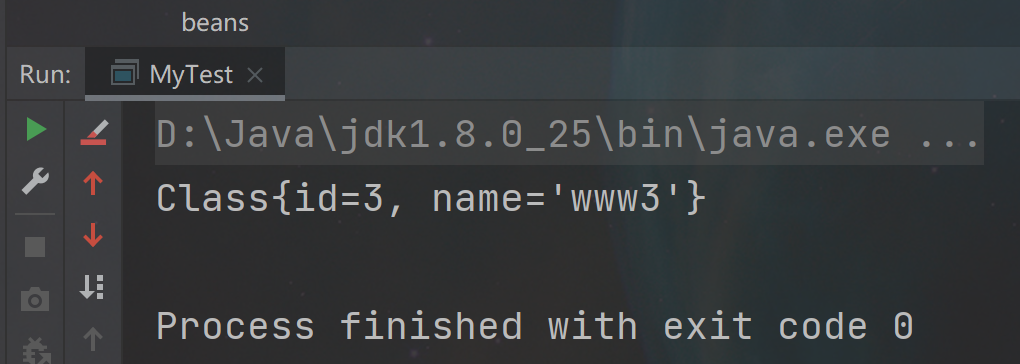
StudentClass studentClass = context.getBean("studentClass3", StudentClass.class);
System.out.println(studentClass);
}
}
|
结果
控制打印出id为studentClass3的对象,该对象的id为3,name为www3