创建项目
引入依赖
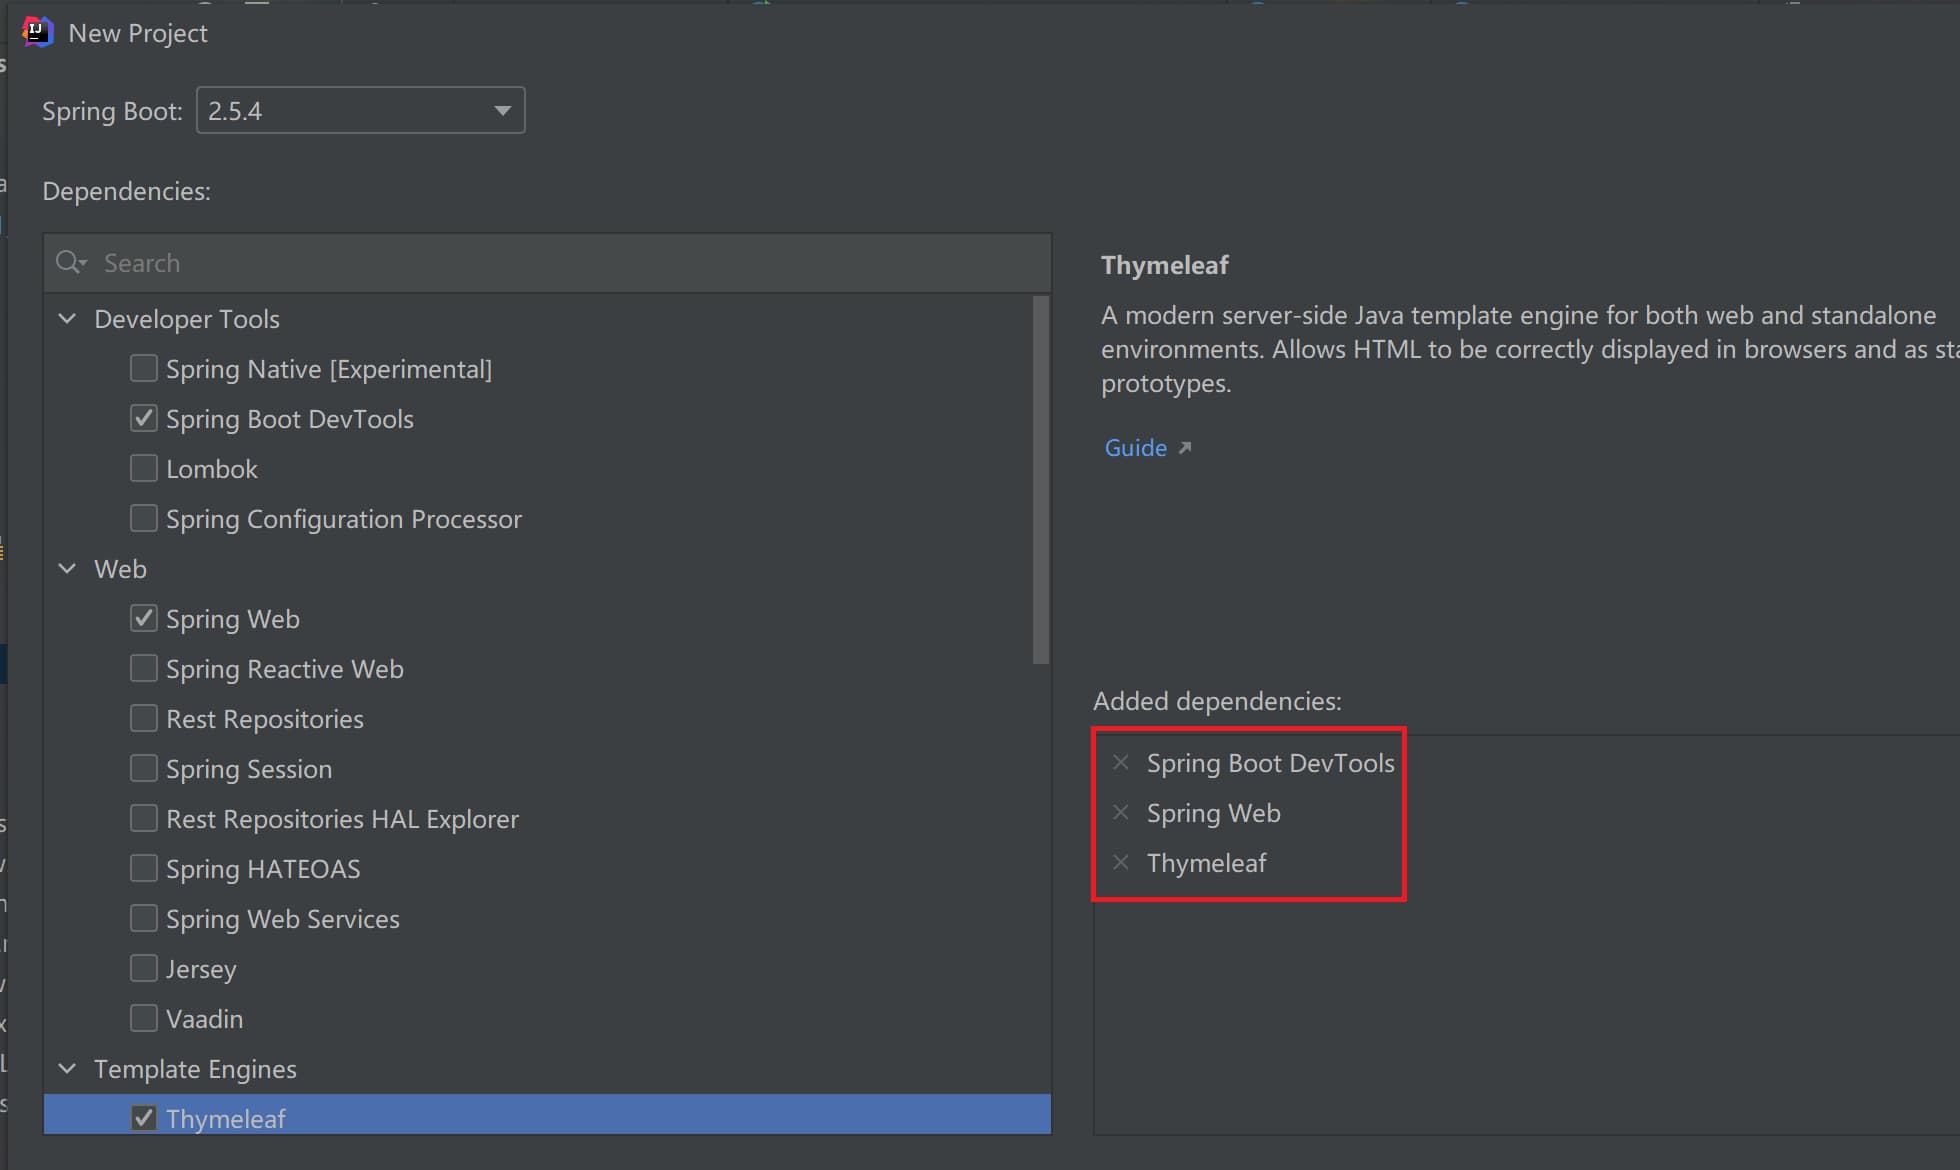
创建一个Spring Boot项目,引入Spring Boot DevTools、Spring Web、Thymeleaf依赖,这里是创建项目时引入,下面是创建后引入,可以创建时引入就尽量创建时引入,比较方便
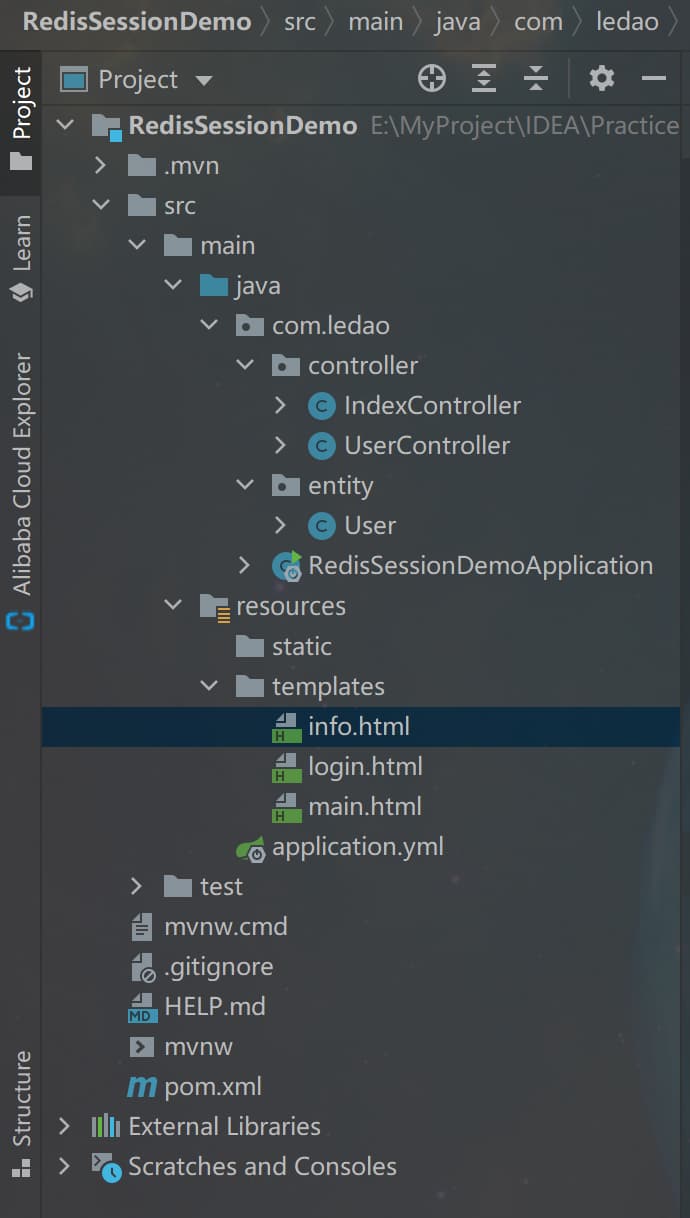
项目结构
引入依赖
在pom文件中添加:
1
2
3
4
5
6
7
8
9
10
11
12
13
14
15
16
17
18
|
<dependency>
<groupId>redis.clients</groupId>
<artifactId>jedis</artifactId>
<version>3.6.2</version>
</dependency>
<dependency>
<groupId>org.springframework.session</groupId>
<artifactId>spring-session-data-redis</artifactId>
<version>2.5.1</version>
</dependency>
<dependency>
<groupId>io.lettuce</groupId>
<artifactId>lettuce-core</artifactId>
<version>6.1.2.RELEASE</version>
</dependency>
|
完整pom.xml
1
2
3
4
5
6
7
8
9
10
11
12
13
14
15
16
17
18
19
20
21
22
23
24
25
26
27
28
29
30
31
32
33
34
35
36
37
38
39
40
41
42
43
44
45
46
47
48
49
50
51
52
53
54
55
56
57
58
59
60
61
62
63
64
65
66
67
68
69
| <?xml version="1.0" encoding="UTF-8"?>
<project xmlns="http://maven.apache.org/POM/4.0.0" xmlns:xsi="http://www.w3.org/2001/XMLSchema-instance"
xsi:schemaLocation="http://maven.apache.org/POM/4.0.0 https://maven.apache.org/xsd/maven-4.0.0.xsd">
<modelVersion>4.0.0</modelVersion>
<parent>
<groupId>org.springframework.boot</groupId>
<artifactId>spring-boot-starter-parent</artifactId>
<version>2.5.4</version>
<relativePath/>
</parent>
<groupId>com.ledao</groupId>
<artifactId>RedisSessionDemo</artifactId>
<version>0.0.1-SNAPSHOT</version>
<name>RedisSessionDemo</name>
<description>Demo project for Spring Boot</description>
<properties>
<java.version>1.8</java.version>
</properties>
<dependencies>
<dependency>
<groupId>org.springframework.boot</groupId>
<artifactId>spring-boot-starter-thymeleaf</artifactId>
</dependency>
<dependency>
<groupId>org.springframework.boot</groupId>
<artifactId>spring-boot-starter-web</artifactId>
</dependency>
<dependency>
<groupId>org.springframework.boot</groupId>
<artifactId>spring-boot-devtools</artifactId>
<scope>runtime</scope>
<optional>true</optional>
</dependency>
<dependency>
<groupId>org.springframework.boot</groupId>
<artifactId>spring-boot-starter-test</artifactId>
<scope>test</scope>
</dependency>
<dependency>
<groupId>redis.clients</groupId>
<artifactId>jedis</artifactId>
<version>3.6.2</version>
</dependency>
<dependency>
<groupId>org.springframework.session</groupId>
<artifactId>spring-session-data-redis</artifactId>
<version>2.5.1</version>
</dependency>
<dependency>
<groupId>io.lettuce</groupId>
<artifactId>lettuce-core</artifactId>
<version>6.1.2.RELEASE</version>
</dependency>
</dependencies>
<build>
<plugins>
<plugin>
<groupId>org.springframework.boot</groupId>
<artifactId>spring-boot-maven-plugin</artifactId>
</plugin>
</plugins>
</build>
</project>
|
application.yml配置
1
2
3
4
5
6
7
8
9
10
11
12
13
14
15
16
17
18
19
20
21
22
23
24
25
| server:
port: 8888
servlet:
context-path: /
tomcat:
uri-encoding: utf-8
spring:
session:
store-type: redis
timeout: PT1H
redis:
flush-mode: on_save
namespace: ledao
redis:
host: 192.168.0.106
port: 6379
password:
lettuce:
pool:
max-active: 8
max-wait: -1
max-idle: 8
min-idle: 0
shutdown-timeout: 100
|
启动类添加注解
添加注解@EnableRedisHttpSession
1
2
3
4
5
6
7
8
9
10
11
12
13
14
15
16
17
18
19
20
21
22
23
24
25
26
| package com.ledao;
import org.springframework.boot.SpringApplication;
import org.springframework.boot.autoconfigure.SpringBootApplication;
import org.springframework.boot.builder.SpringApplicationBuilder;
import org.springframework.boot.web.servlet.support.SpringBootServletInitializer;
import org.springframework.session.data.redis.config.annotation.web.http.EnableRedisHttpSession;
@EnableRedisHttpSession
@SpringBootApplication
public class RedisSessionDemoApplication extends SpringBootServletInitializer {
@Override
protected SpringApplicationBuilder configure(SpringApplicationBuilder application) {
return application.sources(RedisSessionDemoApplication.class);
}
public static void main(String[] args) {
SpringApplication.run(RedisSessionDemoApplication.class, args);
}
}
|
Java代码
User.java
要实现Serializable序列化,不然会Redis会报错:org.springframework.data.redis.serializer.SerializationException: Cannot serialize
1
2
3
4
5
6
7
8
9
10
11
12
13
14
15
16
17
18
19
20
21
22
23
24
25
26
27
28
29
30
31
32
33
34
35
36
37
38
39
40
41
42
43
44
45
46
47
48
49
50
51
52
53
54
| package com.ledao.entity;
import java.io.Serializable;
public class User implements Serializable {
private static final long serialVersionUID = -1;
private Integer id;
private String userName;
private String password;
public Integer getId() {
return id;
}
public void setId(Integer id) {
this.id = id;
}
public String getUserName() {
return userName;
}
public void setUserName(String userName) {
this.userName = userName;
}
public String getPassword() {
return password;
}
public void setPassword(String password) {
this.password = password;
}
@Override
public String toString() {
return "User{" +
"id=" + id +
", userName='" + userName + '\'' +
", password='" + password + '\'' +
'}';
}
}
|
IndexController.java
1
2
3
4
5
6
7
8
9
10
11
12
13
14
15
16
17
18
19
20
21
22
23
24
25
26
27
28
| package com.ledao.controller;
import org.springframework.stereotype.Controller;
import org.springframework.web.bind.annotation.RequestMapping;
import org.springframework.web.servlet.ModelAndView;
@Controller
public class IndexController {
@RequestMapping("/")
public ModelAndView root() {
ModelAndView mav = new ModelAndView();
mav.setViewName("login");
return mav;
}
@RequestMapping("/getInfo")
public ModelAndView getInfo() {
ModelAndView mav = new ModelAndView();
mav.setViewName("info");
return mav;
}
}
|
UserController.java
1
2
3
4
5
6
7
8
9
10
11
12
13
14
15
16
17
18
19
20
21
22
23
24
25
26
27
28
29
30
31
32
| package com.ledao.controller;
import com.ledao.entity.User;
import org.springframework.stereotype.Controller;
import org.springframework.web.bind.annotation.RequestMapping;
import org.springframework.web.servlet.ModelAndView;
import javax.servlet.http.HttpSession;
@Controller
@RequestMapping("/user")
public class UserController {
@RequestMapping("/login")
public ModelAndView login(HttpSession session, User user) {
ModelAndView mav = new ModelAndView();
String password = "123";
if (password.equals(user.getPassword())) {
session.setAttribute("currentUser", user);
mav.setViewName("main");
} else {
mav.addObject("errorInfo", "用户名或者密码错误!");
mav.setViewName("login");
}
return mav;
}
}
|
HTML页面
login.html
1
2
3
4
5
6
7
8
9
10
11
12
13
14
15
16
| <!DOCTYPE html>
<html lang="en">
<head>
<meta charset="UTF-8">
<title>登录</title>
</head>
<body>
<form action="/user/login" method="post">
用户名:
<input type="text" name="userName">
密码:
<input type="text" name="password">
<input type="submit" value="提交">
</form>
</body>
</html>
|
main.html
1
2
3
4
5
6
7
8
9
10
11
| <!DOCTYPE html>
<html lang="en" xmlns:th="http://www.thymeleaf.org">
<head>
<meta charset="UTF-8">
<title>Title</title>
</head>
<body>
<h1>登录成功</h1>
<h2 style="color: blue">当前用户:<sapn th:text="${session.currentUser.userName}"></sapn></h2>
</body>
</html>
|
info.html
1
2
3
4
5
6
7
8
9
10
11
| <!DOCTYPE html>
<html lang="en" xmlns:th="http://www.thymeleaf.org">
<head>
<meta charset="UTF-8">
<title>Title</title>
</head>
<body>
当前用户信息:
<span th:text="${'用户名:'+session.currentUser.userName+',密码:'+session.currentUser.password}"></span>
</body>
</html>
|
测试
浏览器地址栏输入:http://localhost:8888/ ,进入登录页面login.html
输入用户名和密码,只要密码是123就可以登录成功,然后进入主页面main.html
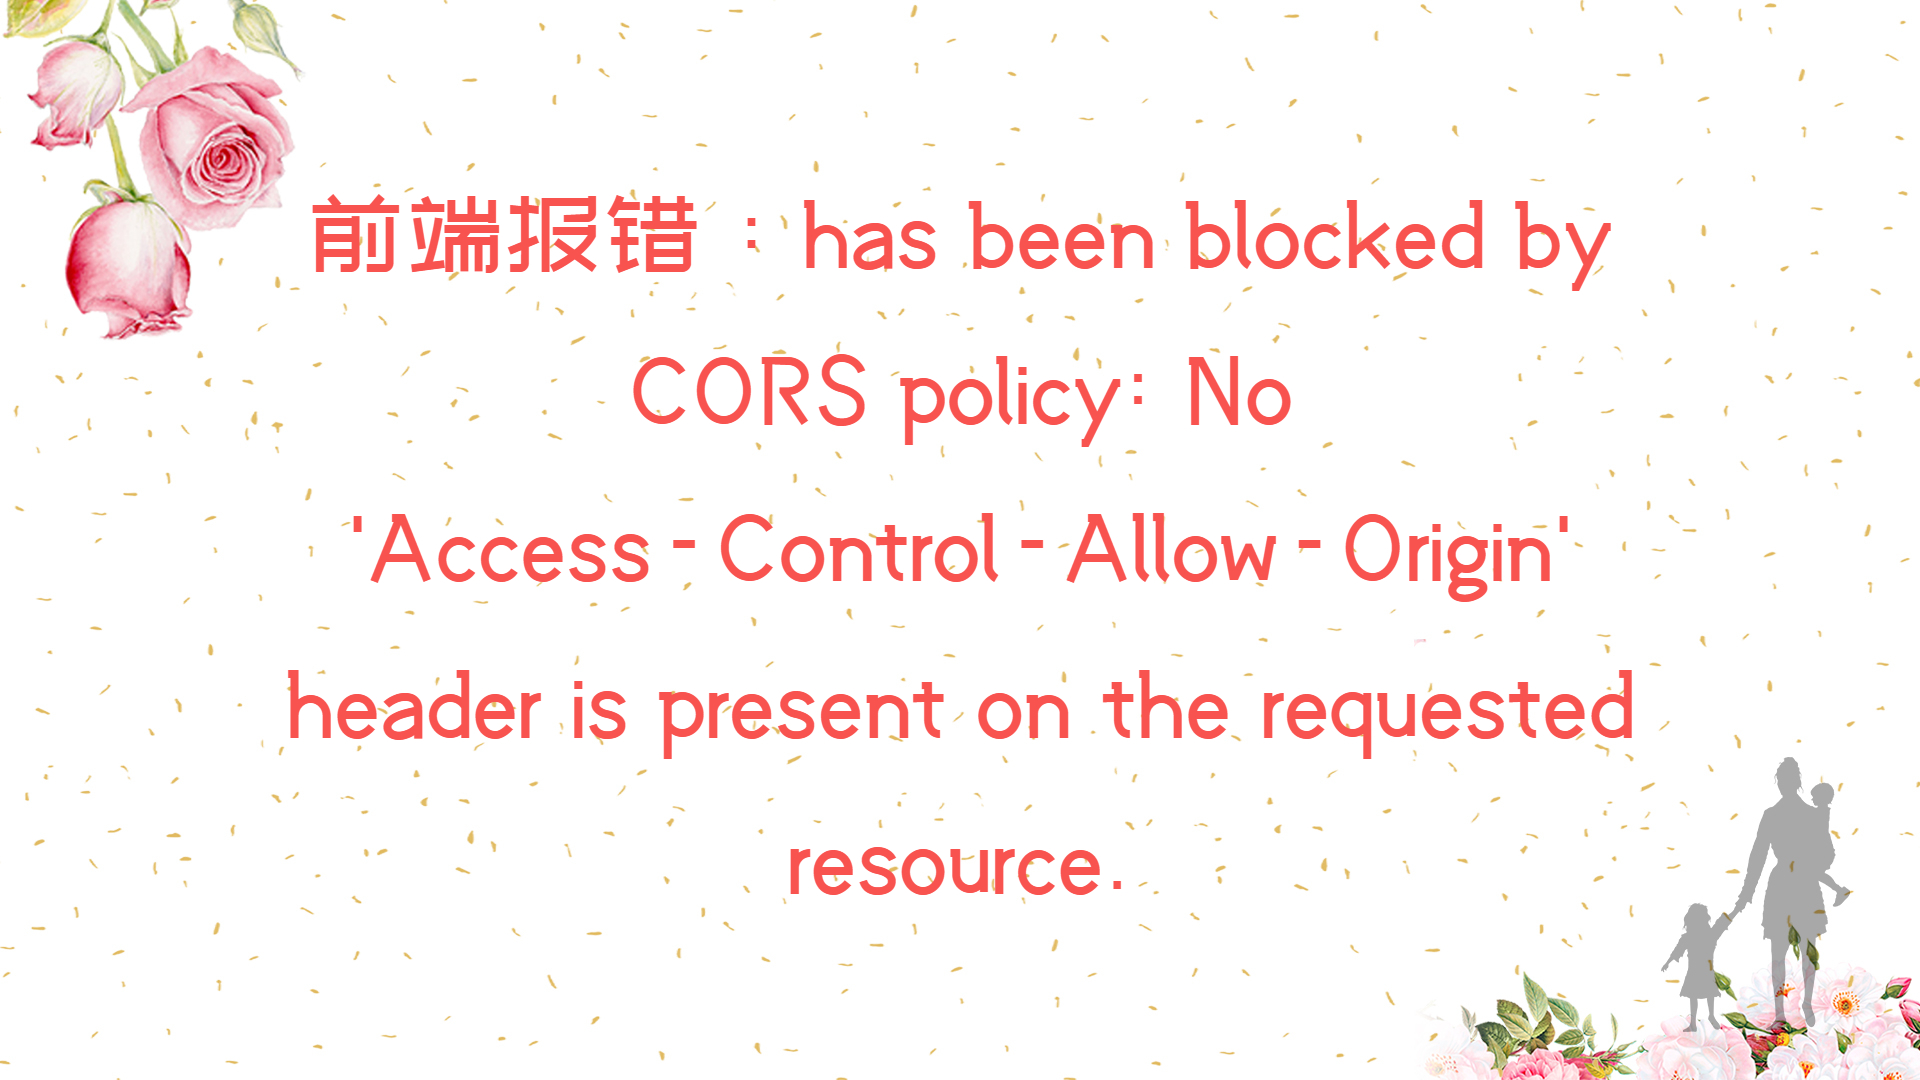
浏览器地址栏输入:http://localhost:8888/getInfo,进入显示当前登录用户信息页面info.html
在Redis可视化工具可以看到有一个用户session
打开另一个浏览器,重复①②③步骤,然后Redis可视化工具可以看到多了一个用户session
PS.
GitHub地址:a6678696/RedisSessionDemo: Redis存储session例子 (github.com)