毕业版本依赖关系
链接:版本说明 · alibaba/spring-cloud-alibaba Wiki (github.com)
下表为按时间顺序发布的 Spring Cloud Alibaba 以及对应的适配 Spring Cloud 和 Spring Boot 版本关系(由于 Spring Cloud 版本命名有调整,所以对应的 Spring Cloud Alibaba 版本号也做了对应变化)
| Spring Cloud Alibaba Version |
Spring Cloud Version |
Spring Boot Version |
| 2021.0.1.0 |
Spring Cloud 2021.0.1 |
2.6.3 |
| 2.2.7.RELEASE |
Spring Cloud Hoxton.SR12 |
2.3.12.RELEASE |
| 2021.1 |
Spring Cloud 2020.0.1 |
2.4.2 |
| 2.2.6.RELEASE |
Spring Cloud Hoxton.SR9 |
2.3.2.RELEASE |
| 2.1.4.RELEASE |
Spring Cloud Greenwich.SR6 |
2.1.13.RELEASE |
| 2.2.1.RELEASE |
Spring Cloud Hoxton.SR3 |
2.2.5.RELEASE |
| 2.2.0.RELEASE |
Spring Cloud Hoxton.RELEASE |
2.2.X.RELEASE |
| 2.1.2.RELEASE |
Spring Cloud Greenwich |
2.1.X.RELEASE |
| 2.0.4.RELEASE(停止维护,建议升级) |
Spring Cloud Finchley |
2.0.X.RELEASE |
| 1.5.1.RELEASE(停止维护,建议升级) |
Spring Cloud Edgware |
1.5.X.RELEASE |
实现过程
创建父项目
创建一个Maven项目,用于管理依赖,pom.xml文件内容如下:
1
2
3
4
5
6
7
8
9
10
11
12
13
14
15
16
17
18
19
20
21
22
23
24
25
26
27
28
29
30
31
32
33
34
35
36
37
38
39
40
41
42
43
44
45
46
47
48
49
50
51
52
53
54
55
56
57
58
59
60
| <?xml version="1.0" encoding="UTF-8"?>
<project xmlns="http://maven.apache.org/POM/4.0.0"
xmlns:xsi="http://www.w3.org/2001/XMLSchema-instance"
xsi:schemaLocation="http://maven.apache.org/POM/4.0.0 http://maven.apache.org/xsd/maven-4.0.0.xsd">
<modelVersion>4.0.0</modelVersion>
<groupId>org.example</groupId>
<artifactId>NacosDemo</artifactId>
<version>1.0-SNAPSHOT</version>
<modules>
<module>nacos_config_test</module>
</modules>
<packaging>pom</packaging>
<properties>
<project.build.sourceEncoding>UTF-8</project.build.sourceEncoding>
<maven.compiler.source>1.8</maven.compiler.source>
<maven.compiler.target>1.8</maven.compiler.target>
<spring-cloud.version>Hoxton.SR9</spring-cloud.version>
<springboot.version>2.3.2.RELEASE</springboot.version>
<springcloudalibaba.version>2.2.6.RELEASE</springcloudalibaba.version>
</properties>
<dependencyManagement>
<dependencies>
<dependency>
<groupId>org.springframework.cloud</groupId>
<artifactId>spring-cloud-dependencies</artifactId>
<version>${spring-cloud.version}</version>
<type>pom</type>
<scope>import</scope>
</dependency>
<dependency>
<groupId>org.springframework.boot</groupId>
<artifactId>spring-boot-dependencies</artifactId>
<version>${springboot.version}</version>
<type>pom</type>
<scope>import</scope>
</dependency>
<dependency>
<groupId>com.alibaba.cloud</groupId>
<artifactId>spring-cloud-alibaba-dependencies</artifactId>
<version>${springcloudalibaba.version}</version>
<type>pom</type>
<scope>import</scope>
</dependency>
</dependencies>
</dependencyManagement>
<build>
<plugins>
<plugin>
<groupId>org.springframework.boot</groupId>
<artifactId>spring-boot-maven-plugin</artifactId>
</plugin>
</plugins>
</build>
</project>
|
创建子项目
在父项目下创建子项目,用于测试读取Nacos的配置文件
pom.xml
1
2
3
4
5
6
7
8
9
10
11
12
13
14
15
16
17
18
19
20
21
22
23
24
25
26
| <?xml version="1.0" encoding="UTF-8"?>
<project xmlns="http://maven.apache.org/POM/4.0.0"
xmlns:xsi="http://www.w3.org/2001/XMLSchema-instance"
xsi:schemaLocation="http://maven.apache.org/POM/4.0.0 http://maven.apache.org/xsd/maven-4.0.0.xsd">
<parent>
<artifactId>NacosDemo</artifactId>
<groupId>org.example</groupId>
<version>1.0-SNAPSHOT</version>
</parent>
<modelVersion>4.0.0</modelVersion>
<artifactId>nacos_config_test</artifactId>
<dependencies>
<dependency>
<groupId>org.springframework.boot</groupId>
<artifactId>spring-boot-starter-web</artifactId>
</dependency>
<dependency>
<groupId>com.alibaba.cloud</groupId>
<artifactId>spring-cloud-starter-alibaba-nacos-config</artifactId>
</dependency>
</dependencies>
</project>
|
创建配置文件
在resources下创建,bootstrap比application的优先级高
application.yml
1
2
3
4
| server:
port: 8080
servlet:
context-path: /
|
bootstrap.properties
1
2
3
4
5
6
7
8
|
spring.application.name=nacos_config_test
spring.cloud.nacos.config.server-addr=121.41.111.106:8848
spring.cloud.nacos.config.group=DEFAULT_GROUP
spring.cloud.nacos.config.name=nacos_config.properties
|
新建Controller类
新建一个controller包,并在里面新建一个Controller类,@RefreshScope注解的作用为:当Nacos的配置文件内容改变后,也能读取修改后的配置,如果不使用这个注解则只能读取修改前的配置
1
2
3
4
5
6
7
8
9
10
11
12
13
14
15
16
17
18
19
20
21
22
23
24
25
26
27
28
29
| package com.ledao.controller;
import org.springframework.beans.factory.annotation.Value;
import org.springframework.cloud.context.config.annotation.RefreshScope;
import org.springframework.web.bind.annotation.GetMapping;
import org.springframework.web.bind.annotation.RequestMapping;
import org.springframework.web.bind.annotation.RestController;
@RefreshScope
@RestController
@RequestMapping("/nacos")
public class NacosConfigController {
@Value("${ledao.name}")
private String name;
@Value("${ledao.age}")
private String age;
@GetMapping("/getUserInfo")
public String getUserInfo(){
return name + " : " + age;
}
}
|
新建启动类
在上面新建的controller包外新建一个启动类,内容如下:
1
2
3
4
5
6
7
8
9
10
11
12
13
14
15
16
17
| package com.ledao;
import org.springframework.boot.SpringApplication;
import org.springframework.boot.autoconfigure.SpringBootApplication;
@SpringBootApplication
public class NacosConfigApplication {
public static void main(String[] args) {
SpringApplication.run(NacosConfigApplication.class, args);
}
}
|
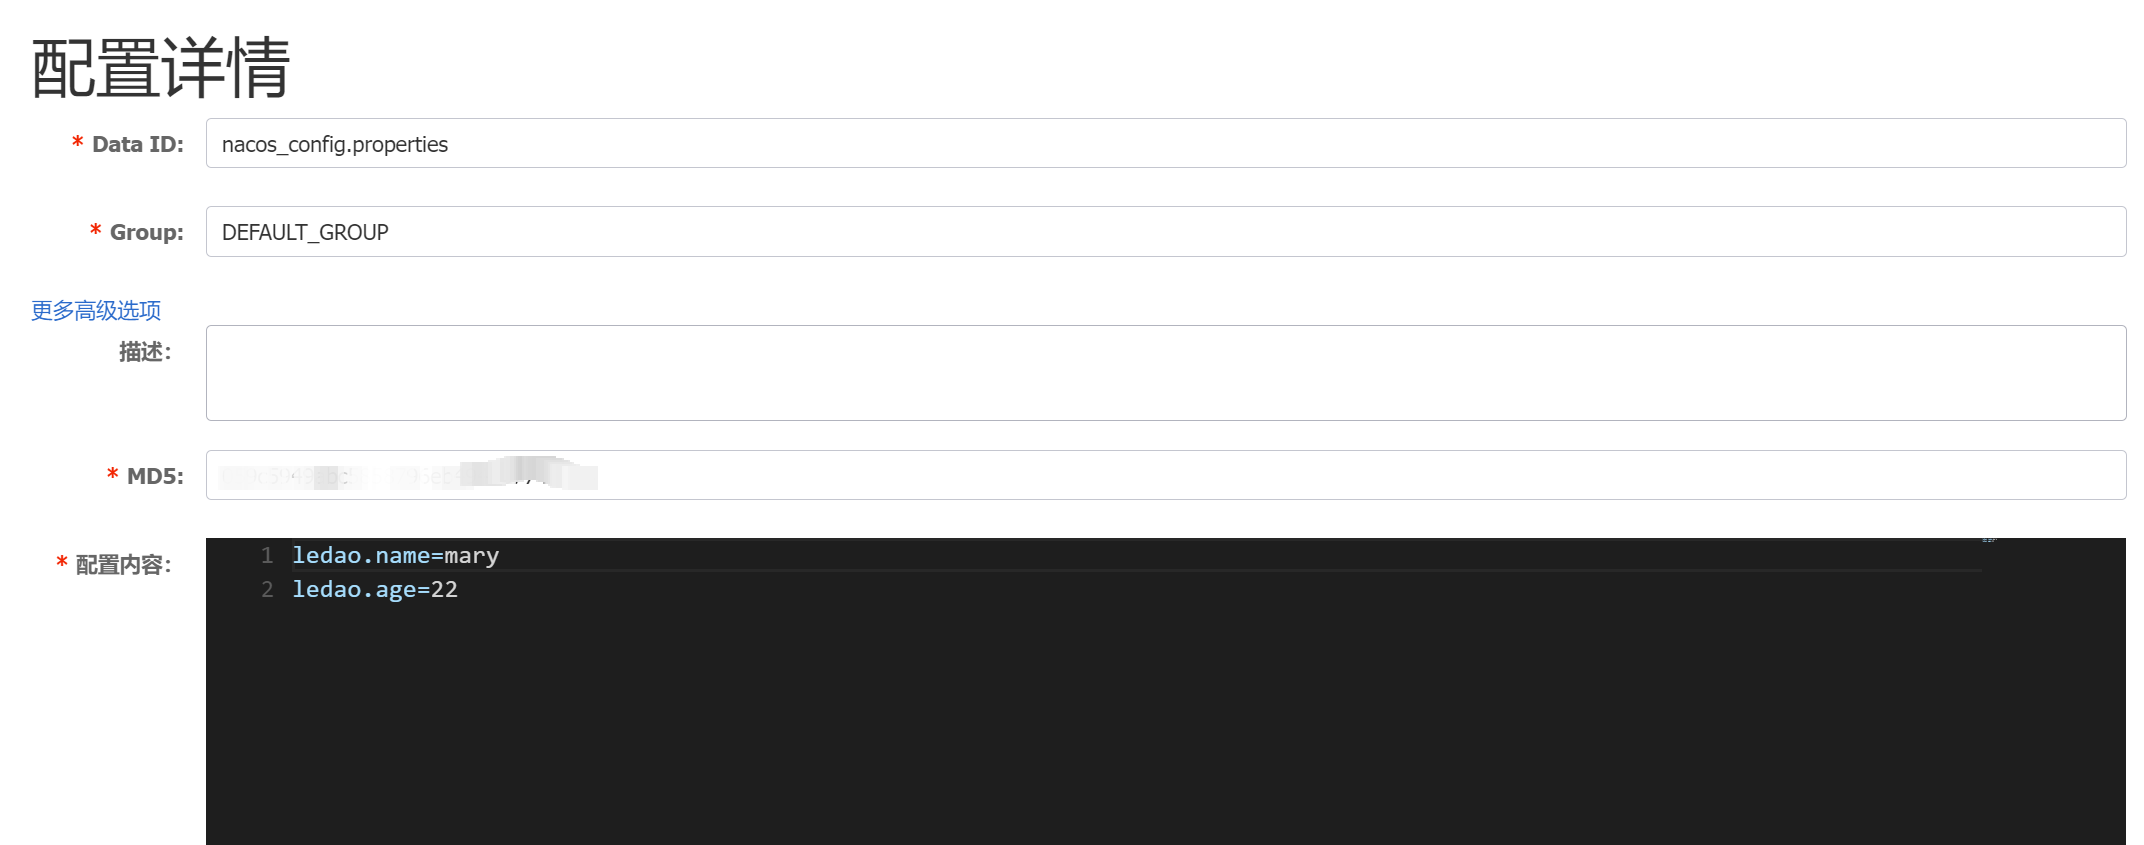
Nacos新建配置文件
先选择配置管理下的配置列表,再点击添加按钮
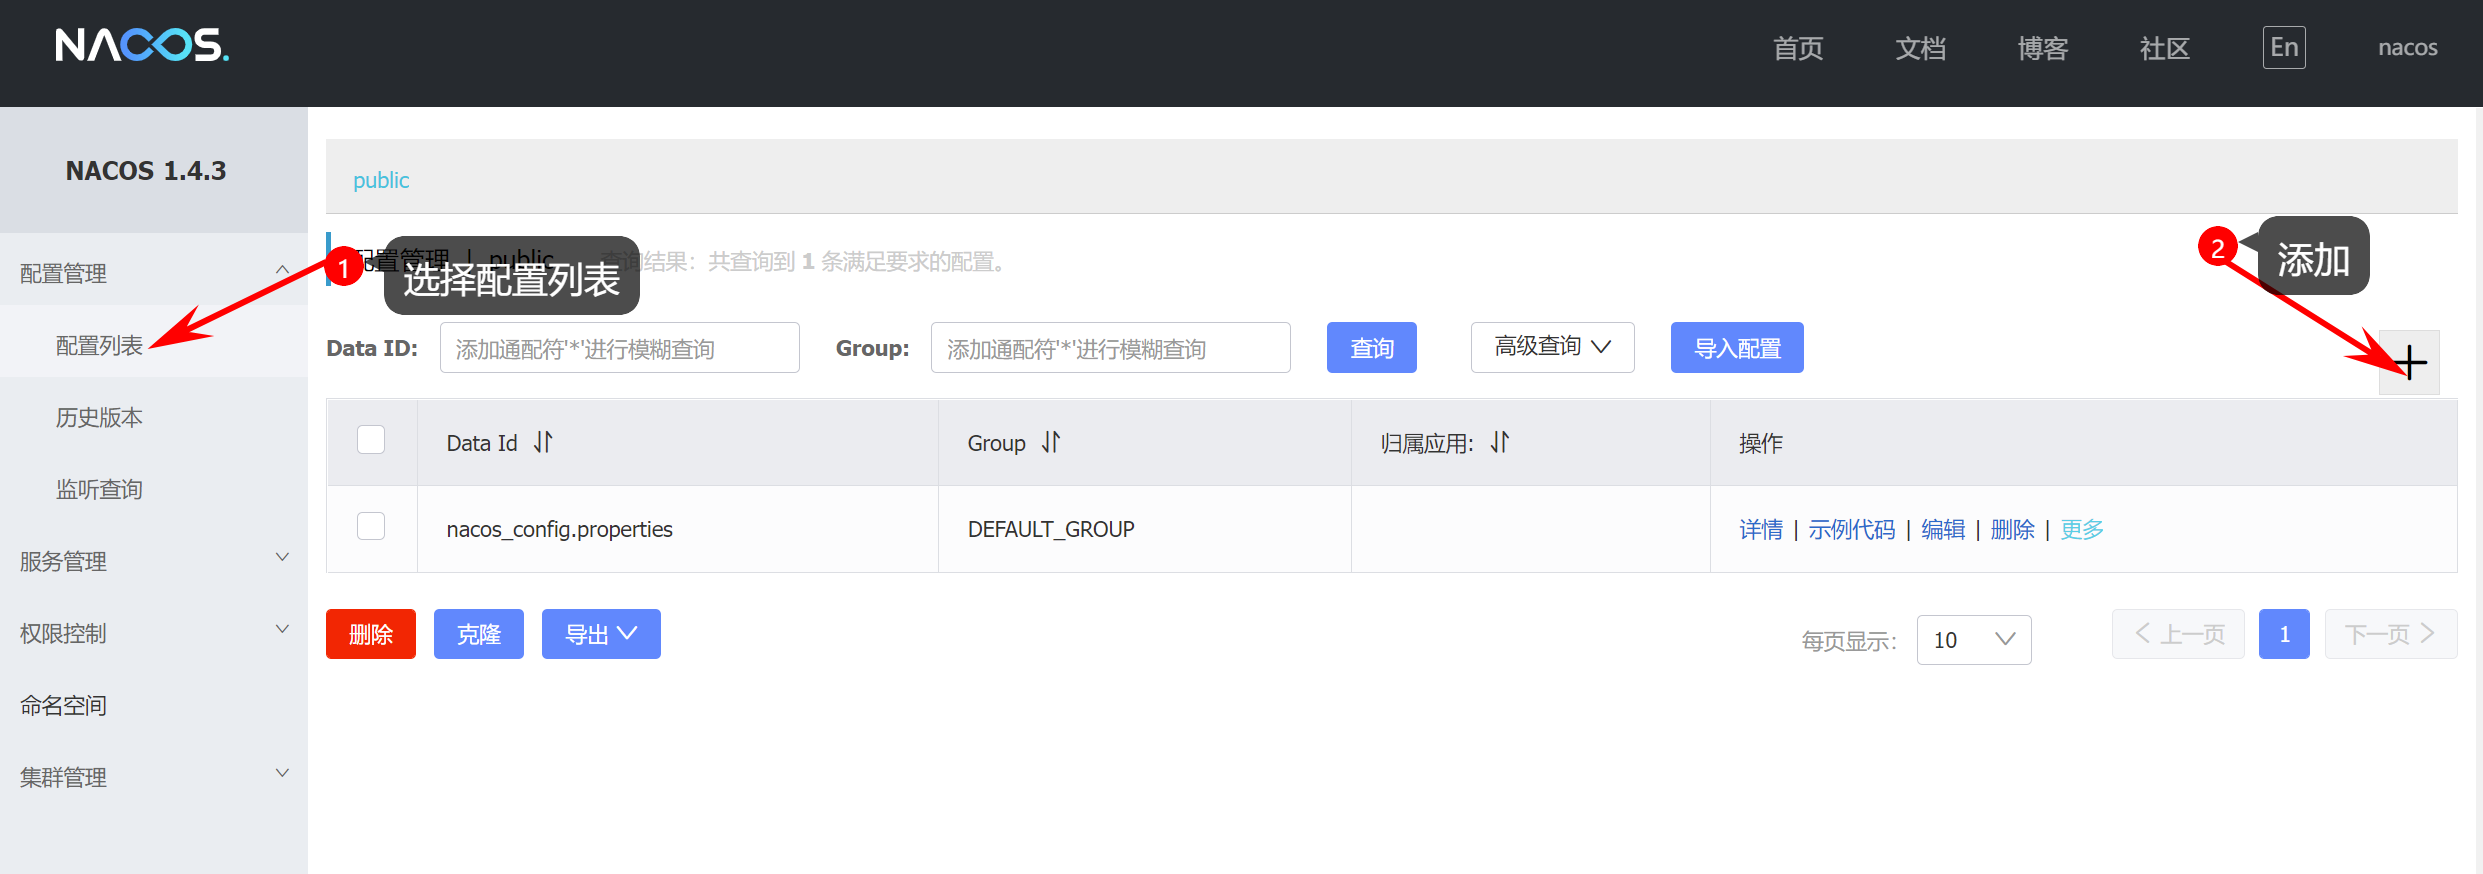
填写配置文件的配置内容,最后点击发布即可
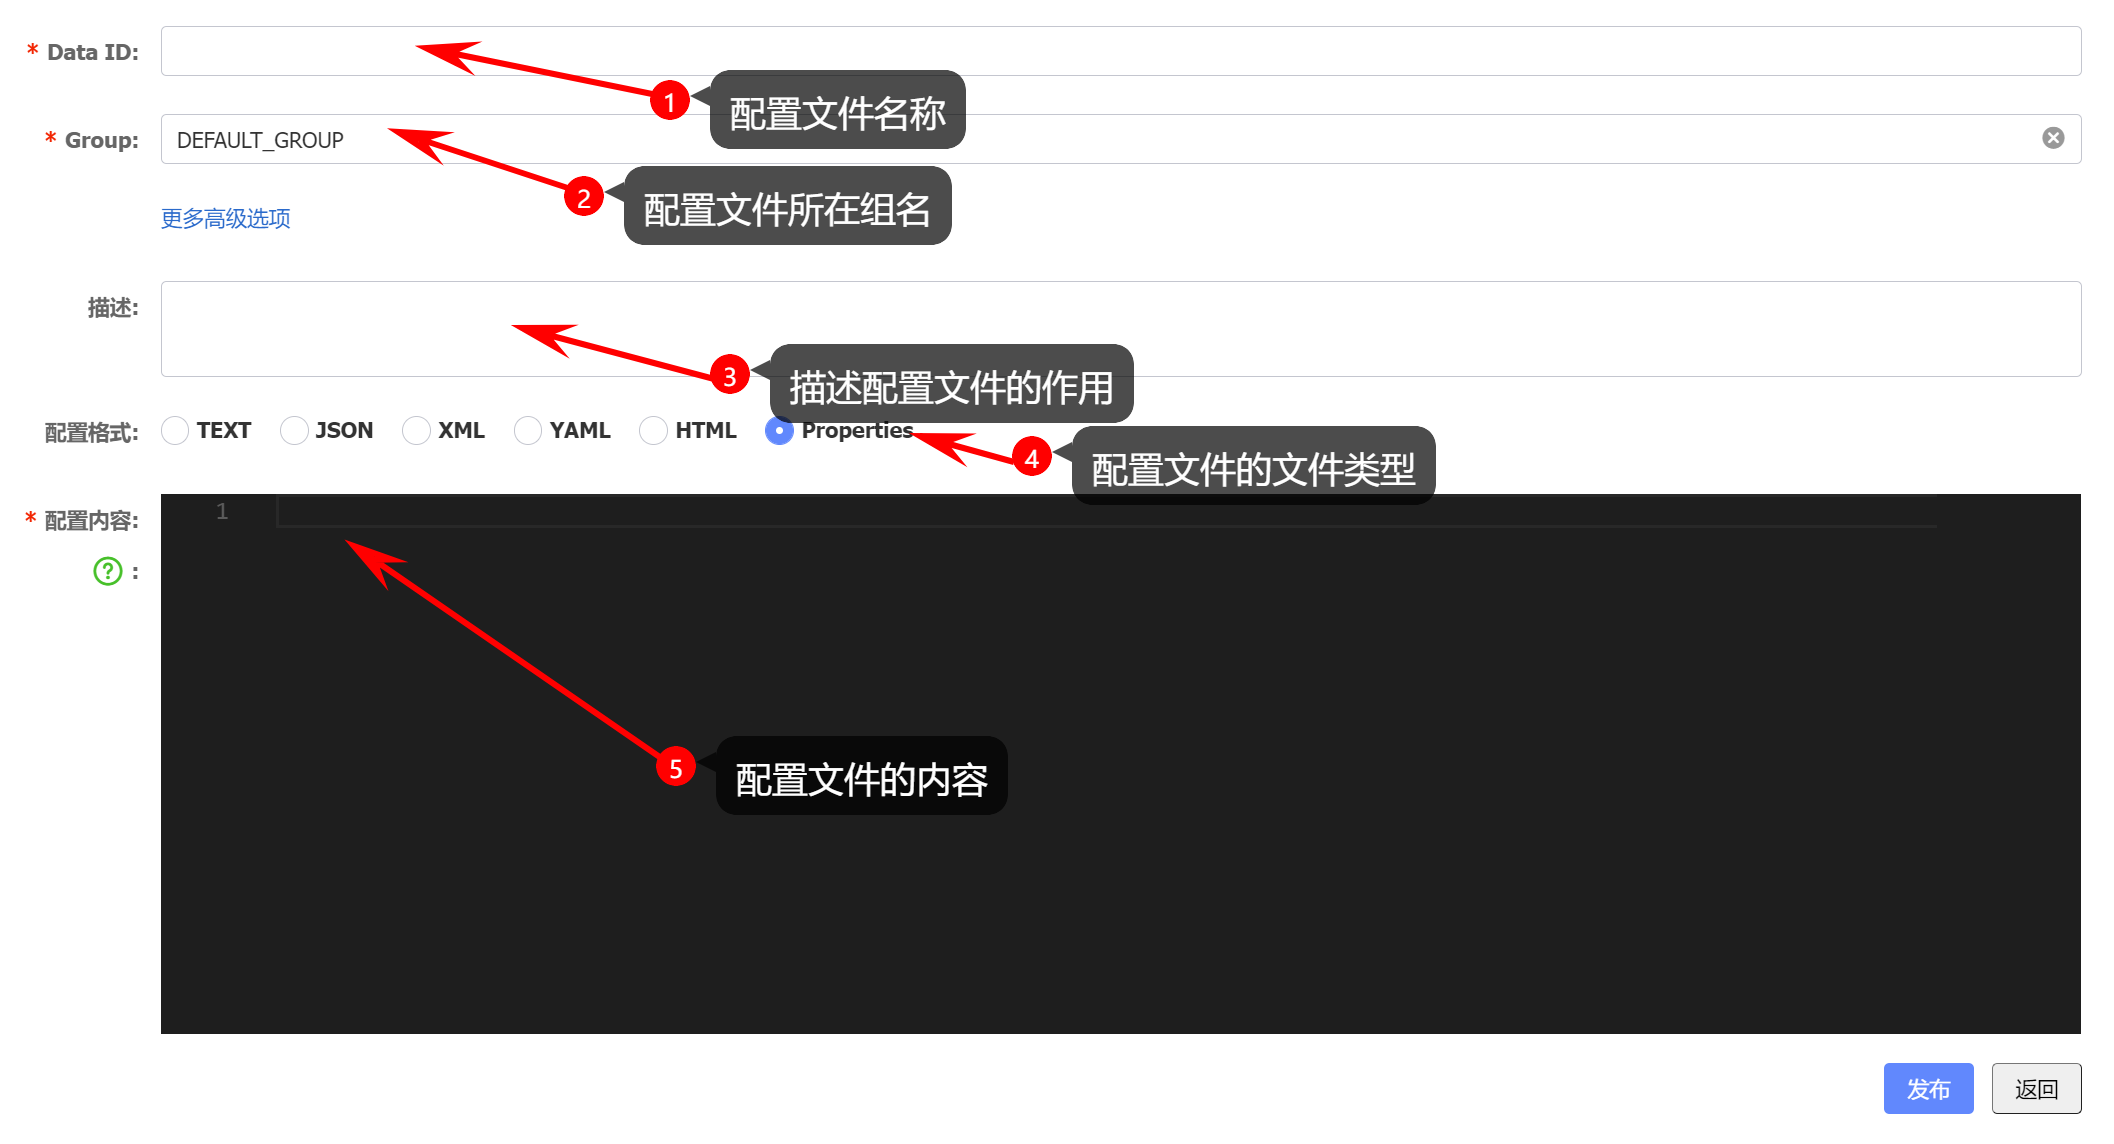
我新建的配置文件如下图
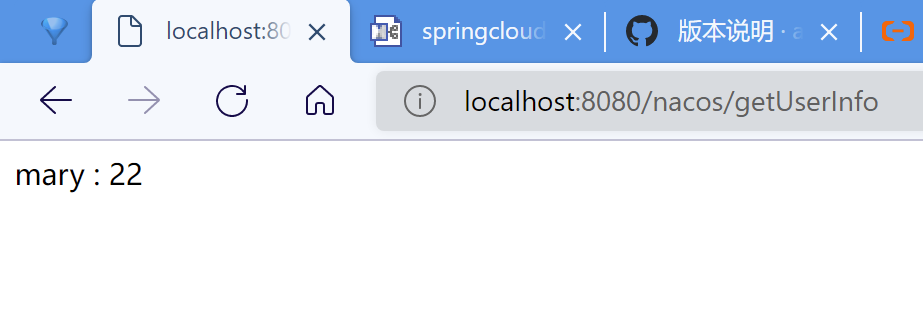
测试
运行启动类,在浏览器地址栏输入:localhost:8080/nacos/getUserInfo,结果截图如下: